
Page 42 - TPM Issue1
P. 42
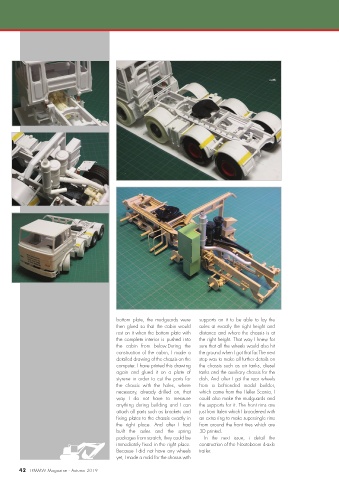
bottom  plate,  the  mudguards  were  supports on it to be able to lay the
                                          then glued so that the cabin would  axles at exactly the right height and
                                          rest on it when the bottom plate with  distance and where the chassis is at
                                          the complete interior is pushed into  the right height. That way I knew for
                                          the  cabin  from  below.During  the  sure that all the wheels would also hit
                                          construction of the cabin, I made a  the ground when I got that far.The next
                                          detailed drawing of the chassis on the  step was to make all further details on
                                          computer. I have printed this drawing  the chassis such as air tanks, diesel
                                          again  and  glued  it  on  a  plate  of  tanks and the auxiliary chassis for the
                                          styrene in order to cut the parts for  dish. And after I got the rear wheels
                                          the  chassis  with  the  holes,  where  from  a  befriended  model  builder,
                                          necessary,  already  drilled  on,  that  which came from the Heller Scania, I
                                          way  I  do  not  have  to  measure  could also make the mudguards and
                                          anything during building and I can  the supports for it. The front rims are
                                          attach all parts such as brackets and  just from Italeri which I broadened with
                                          fixing plates to the chassis exactly in  an extra ring to make supersingle rims
                                          the  right  place.  And  after  I  had  from around the front tires which are
                                          built  the  axles  and  the  spring  3D printed.
                                          packages from scratch, they could be     In  the  next  issue,  i  detail  the
                                          immediately fixed in the right place.  construction of the Nooteboom 4-axle
                                          Because I did not have any wheels  trailer.
                                          yet, I made a mold for the chassis with

        42 TPMMW Magazine - Autumn 2019